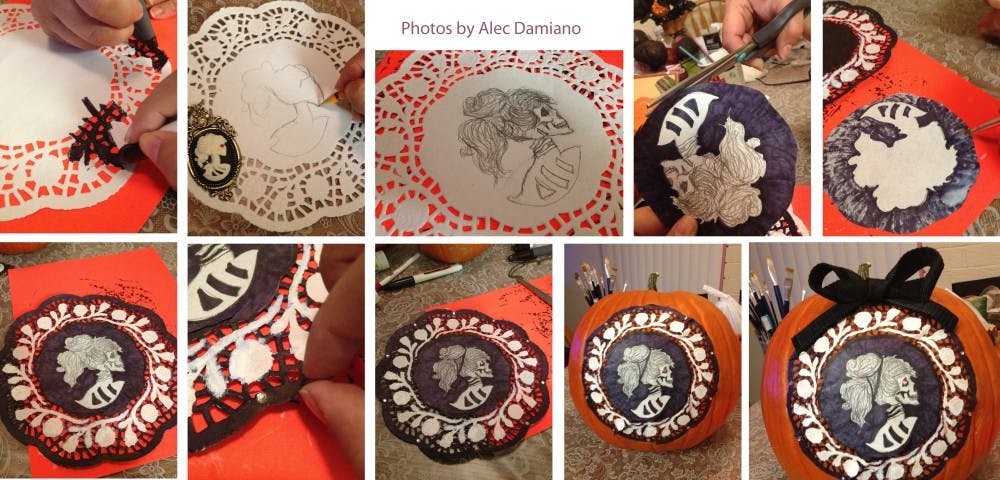
 From left to right, the step by step process of creating the ultimate Halloween pumpkin.
Are you sick of getting your hands full of orange goop and slippery seeds every late October? Carving a jack-o-lantern can literally be a pain when those fluids start stinging the invisible cuts on your hands. But making a festive pumpkin for this Halloween is easier than you think.
For this project, we will be creating a skeleton cameo that will be pasted to the face of the pumpkin.
You’ll need:
A pumpkin Paper doilies Black ribbon or cord Black markers Pencil Black pen Rhinestones White glue Paintbrush Double-sided tape
Step 1: Paint one of the doilies black with the markers. (Optional) Leave a few of the patterns white to add more variety.
Step 2: Draw the a skeleton’s bust (head and upper chest) on another doily with pencil. I used one of my own necklaces for inspiration and looked up a picture of a skull on Google for reference purposes.
Step 3: Paint the area around the skeleton black with marker. You can also add more details to the skeleton with the marker and pen.
Step 4: Cut the skeleton piece out. Don’t cut too close to the skeleton itself. This will make it easier to glue on later.
Step 5: Use your paintbrush to paint white glue to the back of the skeleton piece. Only paint in the black areas, because if glue gets onto the white areas, you will lose some of your details.
Step 6: Paste the skeleton onto the first doily. This is now your cameo.
Step 7:Accentuate the edges of the cameo with rhinestones, glitter, or anything else lying around your house. I’m using self-adhesive rhinestones that are sold to decorate cell phones.
Step 8: Paste a rhinestone on the skeleton’s eye.
Step 9: Tape the cameo onto the pumpkin with double-sided tape.
Step 10: Tie the black ribbon into a bow and paste it onto the pumpkin above the cameo. You’re done!
Other ways to decorate a pumpkin without carving it:
• Get a hold of some glow-in-the-dark paint and black electrical tape. Paint the entire pumpkin and form a face with the black tape. You’ll have an inverse jack-o-lantern. Instead of the face glowing, the rest of the pumpkin will glow! • Make sure you have a pumpkin with the stem still attached. Turn it on its side and use the stem as the nose for a face. • Turn your pumpkin into a blinged-out spiderweb. Paste rhinestones all along the ridges of the pumpkin and create a spiderweb pattern. Just add a spider! • Overused technique but still handy: Grab some acrylic or poster paint and paint your own designs onto the pumpkin. • Wrap your pumpkin in festive lacy fabric. You can find this fabric at stores like JoAnn’s. Put it on a large enough cake or candle stand and add a touch of elegance to any Halloween gathering. • Use a doily as a stencil. Put it at the top of the pumpkin and use a marker to etch the design onto it.
Next blog: For those of you who still want to break out the carving tools, ways to make your jack-o-lantern unique! Stop relying on those predictable little pattern books containing the same old designs that you see at every store. Includes dry ice, smoke bombs and fire!
Do you know of any interesting art, entertainment or crafts you’d like me to cover? Tweet me at @DamianoAlec or email me at Alec.Damiano@asu.edu. To see some of my artwork, click here.