
With Thanksgiving being later than usual and Downtown Phoenix boasting more holiday decorations than ever this year, I instantly got into the holiday spirit the minute December 1 hit. I started decorating my dorm and even helped decorate at some of my friends’ houses.
Unfortunately, one of my fatal, annual procrastinations is always putting off holiday shopping to the last minute. I wanted to get a jump-start this year, since I’m not receiving any financial help from my parents. But at least, when it comes to family and good friends, people love to get creative, homemade gifts.
So, I set out for JoAnn Fabric and attempted to create the best crafts that give you the most bang-for-your-buck. I settled on about five different craft ideas, but I’ll show you my top two picks today. In total, through savvy shopping (and a few extended Black Friday sales) each gift (for thirteen people in total) cost me less than $4. Not bad, right? Just keep in mind that shopping around and taking the time to price-check is a monetary must for college students. Borrow supplies when you can because purchasing less yields the best results. Plus, buying in bulk (for more people) often leads to a lower final cost. Without any further ado, here are some great holiday gift ideas:
DIY Mason Jar Snow Globe:
You Will Need:
- 1 Mason Jar w/ a tight-fitting lid
- Fake snow
- Regular glue
- Superglue
- Water
- Liquid Glycerin
- Small figurines or decorations
- Glitter (optional)
Step One:
I recommend buying a few different kinds of mason jars and testing them out. Some leak more than others and even though we’re going to seal the lids at the end, the less leakage in the beginning, the better off you are. Fill each jar with water and pick the one that leaks the least. You can usually return the other jars within 30 days of purchase, but check the return policies wherever you’re shopping first!
Step Two:
Allow your jar to completely dry and then unscrew the lid. Decorate the bottom-side of the circular part of your jar’s lid, starting with your biggest items first. For example, in my snow globe I used a tree and covered the ground in snow. Since the tree is bigger, I first super-glued that to the bottom and then I super-glued the snow. This way, the heaviest items adhere to the lid first and have less of a chance of falling off. Let your decorations dry for at least 24 hours.
Step Three:
Fill your mason jar almost completely with water, leaving a little room at the top for snow, glitter, glycerin, and your lid.
Step Four:
Less is more when it comes to step four. Take a small pinch of fake snow and glitter (optional) and sprinkle it in the water. Don’t add too much or your snow globe will look overcrowded. Stir. Now add in your liquid glycerin. (It was a bit hard for me to find liquid glycerin this year, but I purchased mine at Target in the pharmacy section.) Add a few drops of liquid glycerin to your mixture - this is what makes your snow “float.”  Stir again.
Step Five:
Screw your lid back on and seal with more superglue. Even if your jar does not leak, use superglue to seal it. Over time, since glass is a liquid, the lid might not fit as snugly and begin to leak. Wait a few hours for the superglue to completely dry. In the meantime, begin to decorate the outside of your jar and lid with glitter, a ribbon or even some wrapping paper.
Step Six:
Turn your snow globe over and shake. You’re all finished!
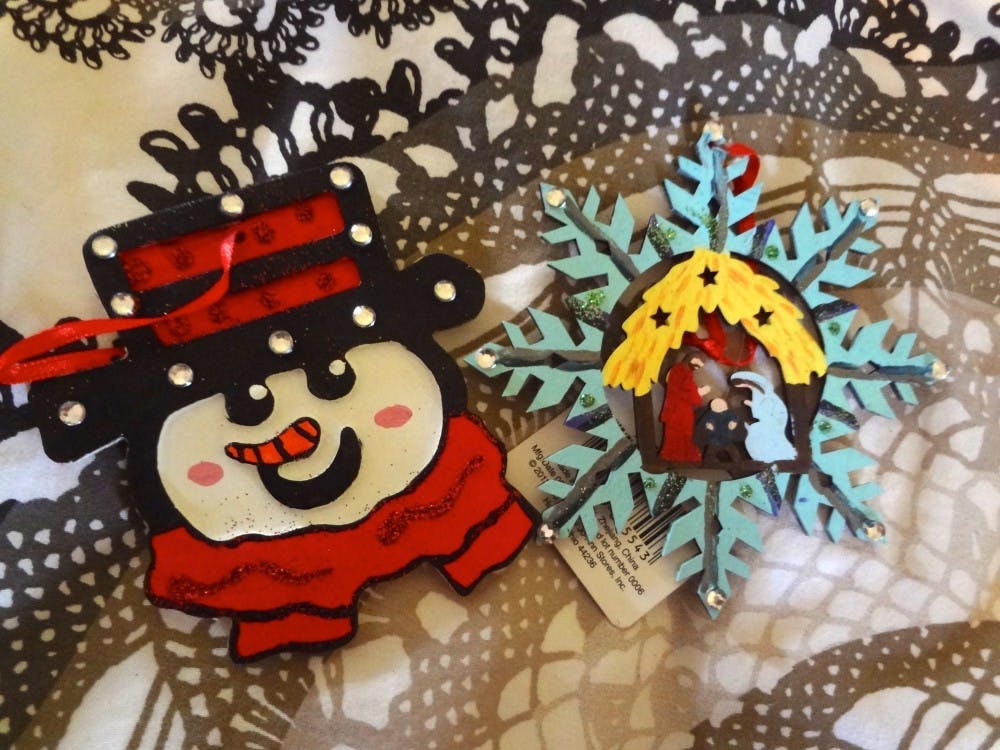
DIY Wooden Ornaments:
You Will Need:
- 1 Plywood Ornament
- Paint
- Brushes
- Rhinestones (optional)
- Glitter (optional)
Step One:
Find an ornament at your local craft store that looks simple and has a finished surface.
Step Two:
Paint a base coat onto the ornament. When it comes to homemade ornaments, it’s all in the details. The more time you spend on the ornament, the better it will turn out. Allow the base coat to dry.
Step Three:
Add details. Add shading, texture and lines to your ornament. this detail will make the ornaments appear more professional. I picked up some on-sale metallic paint to make my ornaments seem more three-dimensional and “wintery.” Remember, details help show the amount of time and effort you put into your ornaments, making the gift more thoughtful and sentimental. Allow detailing paint to dry.
Step Four:
Add the finishing touches. Rhinestones and glitter add an additional 3D element to your ornament, making it that much more festive. Paint the back, add a quick “to” and “from” and you’re finished!
Contact me at adersch@asu.edu or @AlexDersch with questions, suggestions or comments. The more communication I get from you the better Eye Candy will be. Thank you!